
 KYC Registration for New Institutes on NSP Portal: (Operational steps involved to get the KYC registration process of the Institute in the NSP portal to onboard a new Institute.
The Know Your Customer (KYC) registration process is an important step for educational institutes to get onboard and registered with the National Scholarship Portal (NSP).
This detailed article walks through the operational steps involved for an institute to complete the KYC registration and get fully functional on the NSP portal.
It provides a step-by-step guide for the Institute Nodal Officer (INO) and Head of Institute (HoI) to follow during the registration process, which involves filling and submitting the KYC form, validating details, uploading documents, and approving the final registration.
KYC Registration for New Institutes on NSP Portal
The key steps involved in the KYC registration process for onboarding a new institute on the NSP portal are:
Step – I: Filling up the KYC registration form by INO
The first step involves the Institute Nodal Officer (INO) filling out the KYC registration form in order to onboard and activate the institute on the National Scholarship Portal (NSP). The INO goes through the process of entering details such as the institute’s AISHE/DISE/NCVT code, the nodal officer’s and head of institute’s Aadhaar information (name, gender, date of birth, mobile number, etc.), and verifying these details.
Key objectives of this step include officially registering the institute on the NSP portal, enabling access to the platform, and populating it with accurate institute and admin user information. After entering and verifying all the required details, the INO prints out the completed KYC registration form to proceed to the next steps.
Step – II: Uploading of KYC form, duly attested by HoI (Head of Institute), by INO on the portal
In the second step, the INO uploads the KYC registration form that was generated in Step 1. The INO needs to print out the registration form, paste a photograph on it, get it signed and stamped by the Head of Institute (HoI) for attestation, and then scan it. The scanned copy of the attested KYC form must be uploaded to the NSP portal by the INO to complete the process.
This step ensures a physical copy of the registration form is authorized by the HoI and the digitized version is submitted on the portal according to the requirements.
Step – III: Approving of the attested KYC Registration form on the NSP portal by HoI
During this stage, the Head of the Institute will validate the scanned registration form completed by the nodal officer on the NSP portal. The Head of Institute will carefully examine all the information in the INO KYC registration form, ensuring its alignment with the details provided in the physical copy of the KYC registration form.
Following the approval by the Head of Institute, the form will then proceed to the approval stage by the SNO/DNO. Upon the completion of the final approval, both the INO and Head of Institute will be issued a Login ID and password for their respective Institutes, delivered to their registered mobile numbers.
With these credentials, they can securely access the NSP portal.
Also Read:
- AISHE Code List of Colleges
- Check Bank Account Linked to Your Aadhaar Number
- How to Change Existing INO and HOI on National Scholarship Portal
- Check Available Scholarships on NSP Portal
- Search Institute/School/ITI registered with NSP
- Special Scholarship Scheme for Jammu & Kashmir & Ladakh
- NSP MOMA Fresh Registration Online
- NSP MOMA Renewal Process
Details of Step I: Filling up the KYC registration form by INO
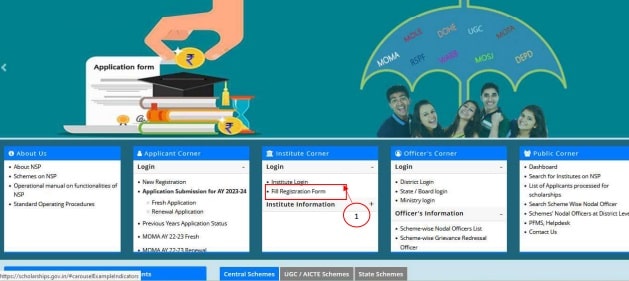
For the New Institute User, click on the ‘Fill registration Form’ to fill in the form details, available on the Home page in Institute Corner Section.
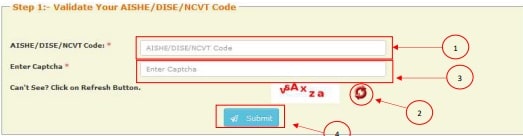
After that, a new window will open. Here enter the AISHE/DISE/NCVT code details and captcha. and enter the Submit Button.
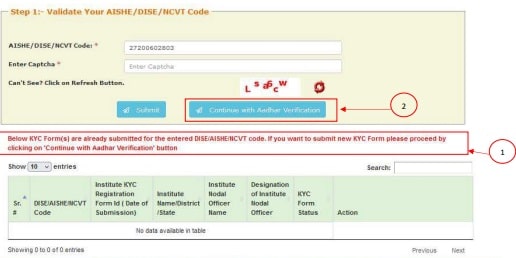
After successfully completing the previous step, you will encounter the next stage. In this section, the INO details highlighted in the Green Grid will indicate no available data because Aadhar details have not been entered or verified. To proceed, select ‘Continue with Aadhar verification’ and enter your Aadhar details for validation. Follow the steps below:
- Review the notification. If the KYC form has been previously filled out, the information will be displayed in the grid below. In such cases, proceed to step 2.
- Click on ‘Continue with Aadhar Verification.’
Upon selecting ‘Continue with Aadhar verification’ you will be redirected to a new page. In this section, the INO is required to input Aadhar card details for verification and validation. Follow the steps below for Institute Nodal Officer (INO) details:
- Enter Aadhar number.
- Input Name as per Aadhar card.
- Enter Date of Birth.
- Select Gender.
- Enter Mobile Number.
- Click on Submit.
Here, Head of Institute (HoI) details are to be entered for Aadhar card verification and validation. Follow the steps below for Head of Institute (HoI) details:
- Enter Aadhar number of HoI.
- Input Name as per Aadhar card of HoI.
- Enter Date of Birth of HoI.
- Select Gender of HoI.
- Enter Mobile Number of HoI.
- Click on Submit.
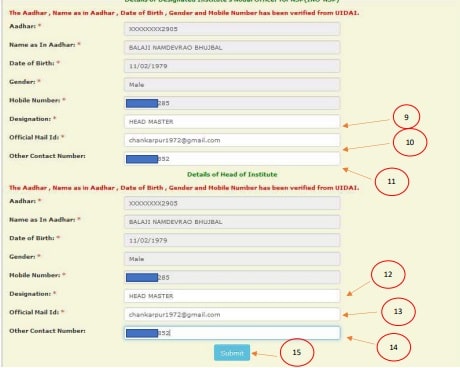
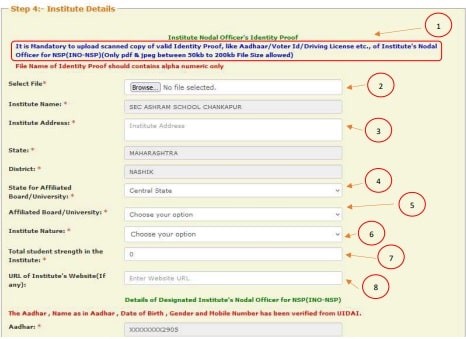
In these sections, the INO is required to input Institute details, verify the information, and submit. Additionally, the INO needs to upload a scanned copy of its Identity proof (as specified below). The INO will also confirm and cross-verify the details linked to Aadhar for the NSP portal. Follow the steps below:
- Carefully read the provided instructions.
- Upload a scanned copy of INO Identity proof. (Accepted identity proofs include Aadhar, Voter ID, license, etc.)
- Enter Institute Address.
- Select the State for Affiliated Board/University.
- Choose the Affiliated Board/University.
- Select Institute Nature.
- Enter the Total Student strength in the Institute.
- Input the URL of the Institute’s Website.
- Enter the Designation of INO.
- Provide the Official Email id of INO.
- Input Other Contact No. of INO.
- Enter the Designation of HoI.
- Provide the Official Email id of HoI.
- Input Other Contact No. of HoI.
- Review all the entered details and click on the Submit button.
Now a new screen will open. On this screen, once all the details including those of INO, HoI, and Institute are entered, the user (INO) is prompted to validate the OTP (One-Time Password) during the registration process. Follow the steps below for OTP validation:
- After submitting the details, enter the 5-digit OTP received.
- Click on the “Confirm OTP” button to complete the validation process.

Now, in this section, the INO is required to take a printout of the KYC form and have it attested (signed and stamped) by the HoI. Additionally, the INO should affix a passport-sized photograph in the designated section. The attested copy of the KYC form will then be scanned and uploaded on the NSP portal. Subsequently, the HoI will approve the KYC form, forwarding it to the DNO or SNO for final approval. Note that the INO will submit the original attested copy to the DNO and retain a photocopy of the attested KYC form in the school for record-keeping purposes. Follow the steps below:
- Review the provided instructions.
- Print out the KYC form and have it attested by the HoI. The subsequent screens will display the KYC Form template.

Details of Step II: Uploading of KYC form, duly attested by HoI, by INO on the portal
After completing the above-mentioned steps, the subsequent windows involve the process of uploading the attested KYC Form.
- For the INO User, click on “Fill Registration form for next steps.”
- On selecting the INO login from Screen 10, Screen 11 appears.
- Enter AISHE/DISE/NCVT code.
- Refresh Captcha.
- Enter Captcha.
- Click to Submit.
- After that, another window will open on your screen.
- View the AISHE/DISE/NCVT code.
- Enter the Captcha.
- Click Submit.
- Read Instructions.
- Click “Print.”
- Update and upload the scanned document copy.
- INO will browse the storage area of the scanned KYC registration form attested by HoI.
- Upload the image file.
- A unique form number is generated and displayed.
- After successfully uploading the file (as shown in Screen 13), view the provided instructions.
- View the Uploaded Attested KYC.
These steps guide the INO through the process of filling the registration form, entering necessary codes, submitting, reading instructions, and finally, uploading the attested KYC form, with a unique form number generated.
Details of Step III: Approving of the attested KYC Registration form on the NSP portal by HoI
The steps as mentioned in below Screens to approve the uploaded KYC registration Document of INO by the HoI. In this section, HoI will approve the details of the KYC registration form and verify all the details.
After following the aforementioned steps, the process continues with the following instructions:
The Head of Institute (HoI) will log in to approve the attested KYC form of the Institute Nodal Officer (INO).
After that, Follow the steps mentioned below:
- Enter AISHE/DISE/NCVT code.
- Refresh Captcha.
- Enter Captcha.
- Click to Submit.
After that, a new tab is introduced, ‘HoI to approve attested KYC form.’ Follow the steps below:
- Enter AISHE/DISE/NCVT Code.
- Enter Captcha.
- Read the Instructions.
- Click on ‘HoI to approve the Attested KYC form.’
Then, the HoI reviews all the details entered by INO and clicks on ‘View Attested KYC document’ to verify the correctness of the details.
In this screen, the HoI will review the scanned copy of the KYC form filled by INO. Follow the below step:
- Click on ‘View this entire document.’
- Post-viewing all the details, the HoI will approve the form as mentioned in point 1. Follow the below step:
- After viewing, see the notification and click ‘OK’ to approve the KYC form.
- View the instructions as the KYC form is successfully approved.
After approval by the HoI, the KYC form goes to the District Nodal Officer (DNO) or State Nodal Officer (SNO) for final approval. Once the final approval is done, login credentials are sent to INO and HoI. They can then click on ‘Institute Login’ to access the NSP portal.
The INO user logs in after entering the details as shown. A default password is generated as an OTP for the first-time login. This default password must be changed by the INO user.
Then, follow the below steps to change the password:
- Enter the OTP and proceed to the next step.
- Click to confirm the OTP.
The INO user needs to change the password as mentioned in the instructions. Follow the below steps:
- Read the instructions to change the password.
- Enter the new password.
- Confirm the new password.
- Submit.
Conclusion
Following the step-by-step procedures outlined in this guide will help institutes successfully complete the KYC registration process for the National Scholarship Portal.
The registration enables the institute to be onboarded and start utilizing the features of the NSP portal. The detailed screenshots and instructions provided here simplify the process for both the Institute Nodal Officer and Head of Institute.
With the final approvals by the HoI and SNO/DNO, the institute can get its login credentials and officially gain access to the portal as a registered user. Completing this critical registration process is key for institutes to participate in the scholarship programs available through the National Scholarship Portal.